Installing Myst III: Exile on Mac OS X
UPDATE 3 September 2009: Installed on Snow Leopard 10.6.0.
While everything seems to run smoothly enough, I can't find an
option in TinkerTool System to use a single processor, meaning that
sound stutters a bit. It's better than dual processors used to be
though… but far from ideal. Last test on Leopard was
10.5.4.
1: Introduction
Alex asked me if this was possible, and the answer is ‘Yes’. But it’s a little fiddly. There is no Mac OS X installer for Myst III: Exile, although there is an updated application. So the installer only works in OS 9, meaning that if you don’t have Classic installed on your Mac, you can’t play the game. On older Macs you can get round the problem by installing Classic, but that’s a poor work-around, and wouldn’t help on the new Intel Macs, which don’t have Classic at all.There is a discussion of the problem here—which is of great help, but it only refers to installing from the DVD edition. So what if you’ve got the original 4-CD edition of Myst III: Exile? There isn’t only one Data folder, and the discussion linked to above mentions a M3Data folder and a Language.m3u file, neither of which seem to be on any of the discs (in my case at least). Well, help is at hand.
You’ll need three things before you try to install the game:
- Tinker Tool—available from here
- m3patch122_us_mac.sit—available from here
- M3OSX1.sit—available from the same place
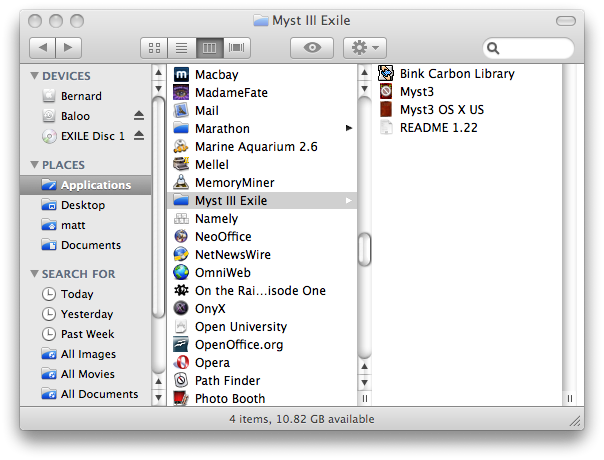
2: Minimum install (250 MB required)
Here’s how to do a minimum install:- In your Applications folder, create a folder called Myst III Exile;
- Use Tinker Tool to Show Hidden and System Files (available under the Finder preference pane)—relaunch the Finder;
- Insert the first disc of Exile, and copy the folder called M3Data into the Myst III Exile folder (the M3Data folder is invisible if you don’t use TinkerTool first);
- Unstuff m3patch, and run the 1.22 installer;
- Unstuff M3OSX1, then copy the Bink Carbon
Library and the Myst3 OS X US file into
Myst III Exile folder.
Don’t worry about the
.DS_Store file(s)—they aren’t important, and if
you delete them, the system will recreate them anyway.
Note that the Language.m3u file is missing, but
that it doesn’t seem to make any difference. The game should play
fine now, but you’ll have to change discs fairly frequently. Also,
if you want to turn off the Show Hidden and System Files option in
Tinker Tool, the game should still work, but you’ll no longer be
able to see the M3Data folder.
3: Complete install (2 GB required)
For a complete install you’ll need follow the instructions given above for a minimum install, but also create four more folders in the Myst III Exile folder, called EXILE Disc 1, EXILE Disc 2, EXILE Disc 3 and EXILE Disc 4 respectively. Then insert each disc, and copy the Data folder into the appropriately-named folder. So the Data folder from from the first disc needs to be copied into the EXILE Disc 1 folder, and the Data folder from the second disc goes into the EXILE Disc 2 folder. Some of the files in each Data folder have the same name—if the Finder asks you if you want to overwrite a file, then something has gone wrong.Here's the complete list, for the sake of clarity:
- In your Applications folder, create a folder called Myst III Exile;
- Create four folders inside the Myst III Exile folder called EXILE Disc 1, EXILE Disc 2, EXILE Disc 3 and EXILE Disc 4;
- Use Tinker Tool to Show Hidden and System Files (available under the Finder preference pane)—relaunch the Finder;
- Insert the first disc of Exile, and copy the folder called M3Data into the Myst III Exile folder (the M3Data folder is invisible if you don’t use TinkerTool first);
- Copy the Data folder into EXILE Disc 1, then eject disc 1;
- Insert disc 2, copy the Data folder into EXILE Disc 2, then eject disc 2;
- Insert disc 3, copy the Data folder into EXILE Disc 3, then eject disc 3;
- Insert disc 4, copy the Data folder into EXILE Disc 4, then eject disc 4;
- Unstuff m3patch, and run the 1.22 installer;
- Unstuff M3OSX1, then copy the Bink Carbon Library and the Myst3 OS X US file into Myst III Exile folder.
The final result should look like this (shown in list view):
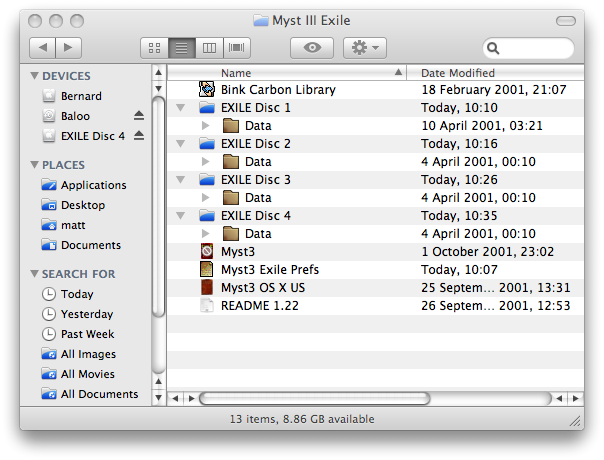
Again, don’t worry about the
.DS_Store files. It doesn’t seem to matter whether
you run the 1.22 update before or after copying the
Data folders.
So, if you're using a pre-Intel Mac, that should do the trick. I'd
recommend doing a complete install, and playing with the video
preferences on the splash screen, until you find the best settings
for you.
4: Intel Macs & Sound Problems
Prompted by justi in the comments, I thought I'd see what I could find out about the sound problems on Intel Macs such as my MacBook. The problem was that the sound in video playback has glitches every second or so, making for a really annoying experience. And it turns out that there is a simple work-around, thankfully. Thanks must go to this thread on the Myst forums for the solution.The sound problem stems from the fact that Intel Macs user a dual processor, while Myst III was designed for a single processor, and simply doesn't know how to use the second. The solution is to turn one of the processors off. However, you can't do that with the default system install—you'll need to download the following file from the Apple Developer's Connection:
Note that the link does not lead directly to the file—you'll need to locate it in the list—and that you may be asked to create an account with Apple Developer Connection, which is free.. Version 4.5.0 is a 35.4MB file, mind you, so I hope you have a decent internet connection (the file may be on the install disc as well but I didn't check). Having downloaded the dmg, double-click to open it and then launch the installer package. That will install a bunch of things in a 'Developer' folder, which you'll find right next to your 'Application' folder. You'll need to do a little digging, but you should find a file called 'Processor.PrefPane'—double-click that and System Preferences will launch, asking for confirmation to install the pane.
The location of 'Processor.PrefPane' should be as follows:
-Macintosh HD
--Developer
---Extras
----PreferencePanes
-----Processor.prefPane
Under the Hardware section of System Preferences you should now see a preference pane for Processor. Open that, and then deselect the check-box for CPU2.
(Another—simpler—option is to use an application such as the excellent shareware application TinkerToolSystem to toggle the number of processors).
And that's it: Myst III: Exile should now run on your Intel-based Mac. Just remember that although Myst III only requires one processor, you should turn the second processor back on when you finish playing, or you might well experience slowdowns in other apps. If you think you'll be switching back and forth a lot you can check the option in the preference pane to show the control in the menu bar.
As before, I'd recommend doing a full install—using the minimum install meant that the CDs were almost permanently in use—I guess from Rossetta converting the information on the fly. And there still may be the occasional glitch—remember that the game was written for OS9, upgraded to OSX, and now runs through using Rossetta translation on Intel, so there's bound to be the odd hiccup. It's possible that selecting ‘optimised video playback’ will lead to a smoother performance—you'll have to test it yourself.
But other than that, the instructions above should allow you to play Myst III: Exile on Mac OS X, and without changing discs. Have fun!