Todelmer (first to second pedestal)
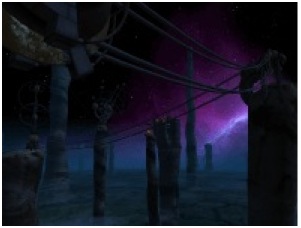
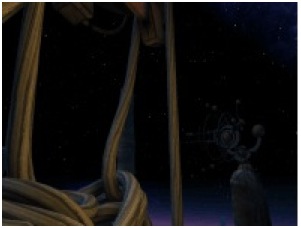
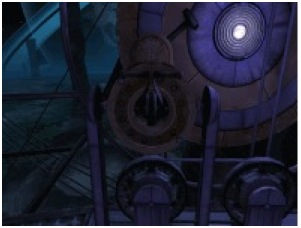
On leaving the sphere you will be greeted by a fabulous vista: a large ringed planet seems to fill the sky, while the landscape around you is dotted with columns of rock which tower high above the clouds. To your left are some precarious-looking steps leading up the side of the column on which you find yourself; while on your right you can see, atop a column in the near distance, a strange mechanism, connected to your column via pulleys and thick cables.
Note: from now on I shall assume that you have left the Slate on the pedestal until it is required. Hence I will not point out if it is not possible to adjust levers or climb ladders when carrying the Slate. In general, you cannot climb or move heavy objects when you have the Slate with you; leaving it on the pedestal and picking it up when you need it is much less annoying and time consuming than having to return it to the pedestal every time you find that you are unable to do something.
Turn and walk up the steps. As you reach the first top of the first flight, you will see a complex network of pulley, cables, and mechanisms spread before you, but also a larger column with buildings and lights.
Continue to the second set of steps, which lead downwards, until you reach a large doorway on your left. As you approach, Esher will appear, and tell you that Todelmer was intended to be an observatory, but was never finished: the disaster which destroyed the civilisation of the D’ni intervened. He also says that such a powerful artefact as the Tablet cannot be given to dreamers like Yeesha (read more).
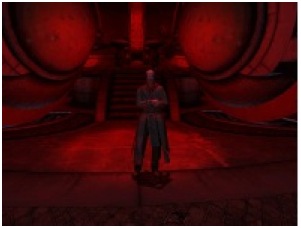
When Esher leaves, you should explore the room. On the raised platform in the centre there is what seems to be some kind of measuring instrument. It displays ten pairs of D’ni numerals; perhaps it is a clock of some sort? It is impossible to tell.
Below the measuring instrument are four large devices with control panels, their functions similarly difficult to fathom. You had better find some way of restoring electricity to the observatory, for at the moment the devices are lifeless.
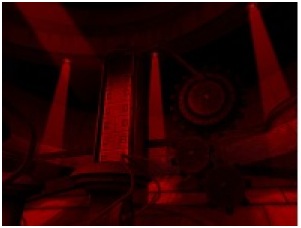
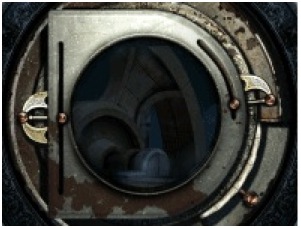
Leave the platform, and explore the room further. At the back of the room you will find another device, with a large lens in the centre and two levers. Playing with the levers will make the lens brighter or darker, depending on their position. Move the left-hand lever to the middle position and and the right-hand lever as far right as it will go, and the device will whirr into life, and the room will become a lot brighter. The electricity is back on.
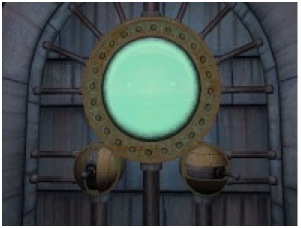
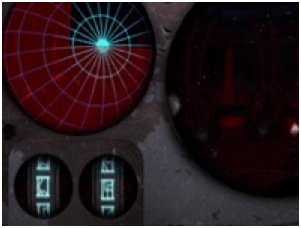
Return to the raised platform and look at the devices once more. It is clear that each device relays the images from a telescope, as if you press the three buttons in the top right corner of the device, the image will zoom in and out—the first button (at the top) has the lowest magnification, and the bottom button has the highest. On the left-hand side of each device is a smaller screen with a grid. The levers above and to the left move the imager around the quarter of the screen which is not red; as you move the levers, the D’ni numerals beneath the screen will scroll, and the button in the centre if the device will flash green. Press this, and you will hear a heavy grinding sound, and the image in the right-hand screen will move. Presumably, then, each device controls a telescope which is trained in on one quarter of the sky.
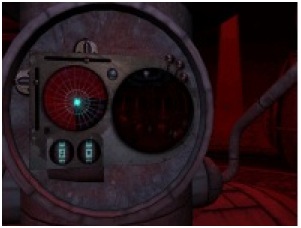
However, the second device on the right—which shows the top left quadrant of the sky—appears to be broken, as all you can see in the main screen is static.
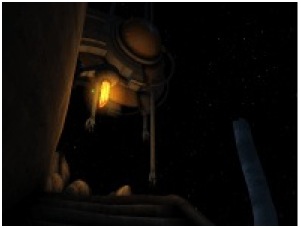
Since there seems to be nothing more to do inside the room at the moment, head outside and up the steps to the left, noticing, as you do, that the large constructions on the columns—the telescopes, you can guess—now display pulsing red lights: turning on the electricity has activated them, too.
However, as you continue your ascent, you will find that one of the telescopes is still lifeless, and that the cables which should have lead to it are now broken and blocking your path. That is why one of the devices shows nothing but static.
Return to the control room now and to the second device on the right. You’ll have to adjust the levers to move the pulleys until the cable no longer blocks your path. The left-hand lever is the important one here, since it moves the telescope on the vertical axis; the topmost lever moves the telescope on the horizontal axis, rotating it. Push the left-hand lever to the top, and then press the flashing button. You’ll hear the pulleys moving; outside, the cable will now no longer be blocking your path, allowing you to continue your ascent. (True, I could have mentioned this earlier, but then you wouldn’t have known why you were doing it ;-) )
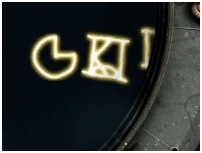
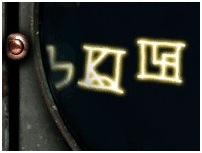
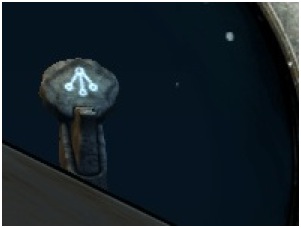
On reaching the top of the column you will see a smaller telescope on you right. Look through the lens of the telescope and you will see the larger column with buildings and lights directly in view. The telescope has three controls: the left-hand lever moves it up and down; the lower-right lever rotates it horizontally; and the upper-left lever offers a zoom function. Zoom in on the column; as you do so you will notice what looks like a cable car, and below that three illuminated glyphs. Note them down: the first should remind you of the control panels of the devices in the observation room below, while the second two are D’ni numerals (13 and 24 respectively). I have included two snapshots here, as it is not possible to to get a single clean view of the glyphs.
Zoom back out a little until you can see the top of the column in its entirety; on the far left is a pedestal which, if you zoom in on it, is unfortunately facing the wrong direction for you to be able to see what its glyph is. Notice that it is facing to the left, so that to be able to read the glyph, you will need to be somewhere even further to the left.
If you now leave the telescope and explore a little, you will see that there is indeed another rock column with lights on it off to the left of the one you were just looking at. It is too far away to make out what is on top of it, and, if you return to the telescope, you will find that a large spool prevents you from getting a clear view.
However, that spool seems to be connected to the cable car; perhaps, if you could find a way of moving the cable car a little, the spool would rotate just enough to get a clear view of the column. If you zoom back in on the cable car, you’ll notice that it is in dock. Perhaps if you moved it a little way out of the dock?
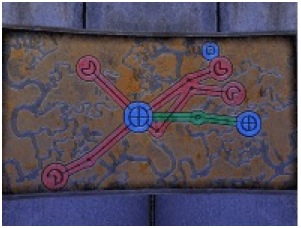
Leave the telescope again and head for the building at the rear of the area. Once inside, you will see a diagram on the back wall; it should be easy enough to interpret from what you have seem so far. The blue circles represent the major columns with lights and buildings; the red circles, which also contain three-quadrant images, correspond to the main telescopes, and the green line connecting two of the blue circles represents the cable car line. The red circle directly underneath the topmost blue circle contains the same glyph you recently saw through the telescope.
There seems to be nothing else of interest in the building, but as you turn to leave you will notice what looks like a white button on the wall behind the door. Press the (similar) button in the middle of the door, which will then close; then press the button on the wall. You’ll hear a noise behind you: turn around and you will find the the floor leaving to the diagram has collapsed to form a hidden staircase.
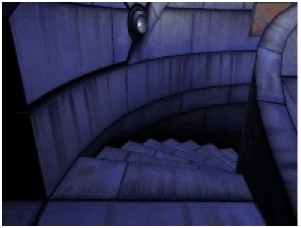
Descending the staircase, you will enter a large room which seems to be directly above the observatory room, judging from cables stretching to the roof and the red light below. Ignore the button at the bottom of the staircase; all it does is raise the steps again, blocking your exit. Follow the metal staircase to the other side of the room (going right or left makes no difference) and you will reach what is clearly the dock for the cable car on this column. On the right you’ll see a winch.
Leave the top lever facing right—logically enough, this lever controls the direction that the cable car will travel. You want to move the car a little way out of the dock of the other column in order to move that spool upstairs. So pull the front lever down just once, then return to the top of the building. You’ll have open the door again get outside, but the staircase will remain where it is.
Then return to the telescope and zoom in on the rock column—you can now see that there is a pedestal top of it and the glyph is clearly in view.
Head back down the steps towards the main pedestal. On the way, you could stop off in the observatory and enter numerals you saw through the telescope into the relevant device—the first on the right. As you move the levers on the left and at the top, the numerals will scroll. You need to move the levers just enough so that the correct two numerals—those you saw through the telescope—appear in the two screens at the bottom. The level of magnification is unimportant.
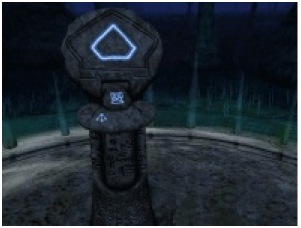
When you have finished, leave the room and continue to the main pedestal to retrieve the Slate. Draw the glyph of the second pedestal which you saw through the telescope onto it (see the Slate Guide for more information), then leave it on the ground and back away. As usual, a Bahro will appear and take the Slate to the second pedestal, and you will be able to link there by touching the newly-illuminated glyph on the main pedestal in the sphere.
––––––––––
previous << | >> next